Complete Rig and Walk Cycle...

 he basic Marty rig is complete! It was fairly easy to rig him because I didn't have to add a whole bunch of constraints or any shape keys like I did with Bone. I could probably go back and limit the rotation of some of the bones in order to make sure they won't intersect with any of the body pieces, but it seems sort of unnecessary.
I worked on a walk cycle for Marty last night and managed to come up with the following:
Marty Walk Cycle from Tim Brown on Vimeo.
For the most part I followed the ManCandy DVD walk cycle tutorials. They are very detailed, so if you plan on making a walk cycle I highly recommend them.
I ran into an odd thing when converting the walk cycle action to an NLA strip. I converted the action over, then repeated it 10 times. Doing this will make him take 10 steps, but unless you specify an offset bone to follow, he will take those 10 steps starting from the same point each time, which is not what I wanted. I wanted him to take steps forward. The offset bone I selected is the Spine1 bone, but for some reason he was leaving his right foot behind as he walked off! If was quite funny to watch, but was wrong obviously! I had to create a Master bone and parent Spine1, along with both feet bones to it. That is why you see those dashed lines sticking out of the back of him during his walk. It works fine now, but it was curious why only the right foot was left behind and not both feet? They are setup the exact same way?
Basic Rig and Gimp...
 he basic bones for my Marty rig are completed now and to test him out I gave him a little Macbeth pose. I ran across just a few things that I'll most likely end up changing. The first thing is that his shoulders are pretty limited on how far they can move without intersecting the body mesh. I'll probably end up making the shoulder hole a bit bigger and changing the pivot point for the upper arm bone to try to fix this a bit. Otherwise he'll be running around with really wide arms all the time! The second thing I'll have to play around with is sort of a basic way to move all his bones at once. I created his rig without following any tutorials or notes (which I'm excited about!) and I forgot to add a root, or master bone. This sounds like it should be easy, but I was running into some troubles with parenting what to what and leaving some bones behind when grabbing and moving the whole armature.
The next couple of pictures were just some photos that I had on my computer that I decided to play with in Gimp. They were both taken last year at the Cherry Blossom festival in Washington, DC. This one on the left was meant to look like an old vintage photo that has been lying around for many years. Increasing the contrast a bit, along with adjusting the color curves gives it that worn look and then I just added some fading to black in the corners.
The photo below I think came out pretty well and really looks like the result I was hoping for. This one was made to look like a still image from a scene in a movie (if you click on it you'll see a bigger version). Enjoy!

Rig Beginning...

 started rigging Marty the robot last night and completed a basic spine. After watching the rigging part of Creature Factory I realized that I probably should have made each sphere and cylinder a separate object, allowing me to simply parent each object to the corresponding bone. This is what Andy does for his Creature and it seems a bit easier than creating a separate vertex group for each bone. I wasn't about to split them all up after modeling was finished, so I'll stick with vertex groups for now.
I also did a quick rigging test to see how the ball and stick joints would look and I'm pretty happy with it. The animation below is obviously very simple, but it shows how the arms, legs, and spine parts should look.
Marty the Robot Rigging Test from Tim Brown on Vimeo.
Marty Model...
.jpg "Marty the Robot")
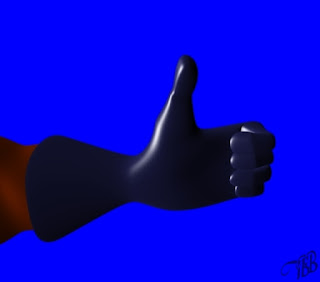
 fter an extremely exciting and wonderful weekend ;-), I did manage to get the hands modeled on Marty the robot last night during the Giants game. I tried to keep the major part of the hand fairly simple for rendering speed purposes, so it's pretty boxy, but I think it looks fine. It's tough to estimate the size of the hand when it's out like in this pose, so I may need to adjust that when I start to move him around.
I'm pretty excited to start rigging him. I've never done any rigging of an inorganic model before. It seems a bit easier at first because you don't have to take in to account how the mesh deforms (there is no deformation), but the constraints may be a bit harder to configure. The Creature Factory DVD by renowned Blender artist Andy Goralczyk, has a section in it about rigging the creature, which is sort of inorganic. Andy really is a great artist and the DVD shows all of the work he went through to create a short film all in Blender. I wouldn't expect to come close to anything that he can do, but something similar to it may be a fun project to tackle in the future.

Merry Christmas!
 quick Christmas wish to get you in the spirit of the season! Made quickly in Gimp last night, enjoy!
Materials...

 o modeling updates today, Marty still needs hands. I did get a chance to play around with the material settings though. I added a nice shiny chrome-like material for the cylinders and a shiny blue material for the body and spheres. There is a color ramp, ray mirror, and a slight texture going on, so quite a bit more complicated then it looks. Hope you like it!
Marty, the New Character...
 ince I finished my Bone character recently I decided to design and rig a completely original character.
  This is the design sketch that came out of my thinking. It's certainly not a finished sketch by any means, but the character I had in mind didn't really require any reference pictures to create in blender, so I figured it was good enough. I knew that I wanted a robotic character that was some what human shaped. He looks somewhat goofy and gangly which is probably why my girlfriend recommended the name Marty.
.jpg "Marty First Render")
Marty is somewhat easy to model, being all mainly spheres and cylinders. On the left is the first render of him. The next step is the hands, which should be pretty quick as well. Obviously the material needs some tweaking, but it's certainly better than the default gray! I'm not sure whether or not the cylinders should be different materials from the spheres, but that's something that I'll look at later. I'm anxious to start rigging him as I haven't done any mechanical rigging before. The cylinders going into the spheres for his joints poses an interesting problem for rigging actually. I'm not exactly sure how I'm going to do it yet. I do know that I want a full range of motion with all his joints. This should hopefully lead to some pretty funny animations in the future!
Bone Walkcycle...
did a little work with my Bone character this past weekend and made a nice little walk cycle for him. There are a couple of things that I would change if I was making this for an animation or a final project, but I think it's pretty good for a first ever walk cycle attempt. Take a look and let me know what you think:
Blender Bone Walkcycle from Tim Brown on Vimeo
In a lot of walk cycles that I've seen your eyes are drawn to the feet and legs because there is nothing else going on with the rest of the body. This makes someone instantly focus on what could be better with the legs and feet. Not wanting to show anybody how poorly my character's legs are actually rigged, I figured I'd draw people's attention to his head and face by adding some head movement, eye blinks, and slight eye brow movement. See, you probably didn't even notice that his legs deform when taking a step!
I'm not real sure what I'm planning on using this little guy for, but it was fun making him. I'm going to call him done for a little while, until I think of something to do with him. I have a couple more projects out there in various states of completeness, so I'll see if I can work on getting one of those completed for now!
Blink...
he Bone character rig is coming along nicely. I have added a bone that drives two shape keys for the eyes to blink.
Blender Blink Bone from Tim Brown on Vimeo.
I used Video Sequence Editor (VSE) in Blender to add the captions to the video. This is not as easy as adding them in CamStudio while making the screen capture, however it allows much more flexibility. For instance, notice how they fade in and out? Notice also how they have transparent backgrounds? I thought you would. The captions are .png images, made in Gimp, of the text with a transparent background. All that was needed to add them to the video was to add both the video (1) and the image (2) to the VSE and create an "Alpha Over" effect in the correct order (2->1). I also wanted them to fade in and out rather than having them instantly pop onto the video. To do this I added a curved IPO curve to the Alpha Over effect.
This was more a learning exercise than anything else, so it's not perfect. I had some trouble matching the frame rates also, so it's a bit jerky, but it does show to blink bone!
The next "step" (pun intended) is to create a walk cycle for this little guy.
Rigged Character...
 y Bone character is coming along nicely. I have been working over the past week on building up an armature for him. This is the first character that I have modeled and rigged from scratch, so I'm quite happy with it.

The rig is based on a few different rigs that I have studied including ManCandy, Captain Blender, and the BSoD Character Animation tutorial rig. The body controls are very basic right now, but as I learn more about building an armature I am adding more functionality.

The hand/finger rig is based on ManCandy's hands. This was quite tricky to get right as Bone has very short, fat fingers. They tend to deform badly when curled in a fist, which is one of the things that I have to work on. Each finger as two bones (one knuckle) that control the deformation of the mesh. Each of them has a small IK target at the tip of the finger which controls the bending of the finger. This small bone is parented to a large bone that does all the controlling. Scaling this large bone will bend the finger and rotating it will control the position of the finger. This allows me to control each finger with just one bone and un-clutters the workspace (I can hide all the rest of the finger bones).
Bone's eyebrows are controlled with two shape keys, one for each side. With the shape key fully on his eyebrows are down, as if thinking or mad. I used a combination of Captain Blender and ManCandy resources to create these keys. It was sort of a pain to move a slider around to control the eyebrows, so I decide to drive the shape keys with a single bone.
Blender Bone Driven Eyebrows from Tim Brown on Vimeo
I think that it came out really nice. The one bone (with a custom shape, which is a first for me!) in the center drives both eyebrows based on its local X and Y locations. It is really easy to pose! BTW, the demo video above was made in CamStudio. The captions were added with CamStudio in real time. They aren't the prettiest looking boxes out there, but very simple to use.
There you have it, Bone is coming along! I still need to complete the hand rigs as only his left hand is done right now. I'd like to also add the ability to make his body/head stretchable, along with some more custom bone shapes to clean up the posing environment.
Multiple Random Things...

he ability to seemingly finish a large project seems to be out of reach for me! I tend to always go on to other things and bounce around a lot. For example, the rose on the right was the result of a quick tutorial and some playing around. Eventually, one of these days, I'm going to have a completed large scale project, but until then, I'm have fun skipping around and just learning everything there is to know about Blender and Gimp!
Speaking of Gimp, I have downloaded the new version, version 2.6. It adds some additional functionality to the text tool and free select tool. There are also some new GUI tweaks, which work very well in Linux, but not so much in windows. This is most notably the ability to keep the toolbox and layers window on top of the main image window. There should be a work around for this, but I haven't found one yet! One somewhat annoying thing is that my watermark script doesn't seem to work in 2.6 as of yet. I'm going to have to look into that.
The next bit of randomness is a new logo for the new layout. The sphere was created in Blender and the wire frame around it was done in Gimp.

Next, I've started modeling a little character with the intention on building up a full rig for him. I decided to embark on this project after downloading the ManCandy FAQ DVD, which documents the build up a very complex rig for a basic character. The rig is very complex and I'm puzzling through it the best that I can, but it is still fun to pose him. The character that I am working on now (left) is based on the comic "Bone" by Jeff Smith. Which is extremely funny and I highly recommend.
Finally, I'll leave you with a desktop that was made for my girlfriends computer. Enjoy!
Sketches...
 long with working on computer projects such as Blender and Gimp, I also enjoy sketching. Although, again, I do not consider myself an artist by any means, I do enjoy it. The image at left started out as a quick sketch of a pose I saw in a picture a number of months ago. It has turned into a bit of a project now, mushing two of my favorite activities together, drawing and biking. I'm still debating about what sort of head to add to him and I obviously have to work on the shading among other things. It's a nice little side project.
 Hopefully you enjoy looking at them as much as I enjoy drawing them!
Webcomics
 n my search for more information about creating webcomics I ran across a book in the local library by author/comic Scott McCloud.
Another New Layout
o after a fairly long time with no updates I have three in two days!
This one is showing off a new layout! I had been thinking about one for a while now and finally got around to it today. I'm also trying to do some things to jazz up the site a little bit, such as adding the larger and colored letter to the beginning of each post. It sort of gives it that little extra design, which I think looks really nice.
I have to tweak this layout a bit more, but it's definitely getting there!
Stick Gymnast
his little guy is just way too much fun not to play with, so here are some more updated stick gymnast renders:
 This last one I attempted to add a motion blur to and I think it came out pretty well. It's the first time I had done this before, so was a bit of an experiment. I sort of wanted just his legs to blur, but it ended up moving everything. I'm thinking this could have been avoided with a clever position of the bezier curve that I used, but I didn't want to get too involved in it. Hope you enjoy it!
Long time update
o after being reminded this weekend that I haven't updated my blog in a while I decided to go ahead and post a quick update. ;-)
 Look for more little scenes with this guy, he is fun!
Desktop Wallpaper...

Pretty cool effect for just a few minutes! I'm pretty simplistic in my desktops, so this fits very nicely.
Yadra
I did a more thorough test on yadra last night and got some nice results. Instead of using a small animation as I did a few days ago, I used a 156 frame scene from the Creature Factory DVD (the scene of the creature walking out of the doorway). Here are the times for rendering on each machine separately:
Optiplex: 2hrs 8min 29sec
Latitude: 3hrs 27min 16sec
HP: 1hr 0min 12sec
I was a little surprised at how fast the vista machine was. I've done a lot to it to make it more streamlined, but nothing hardware wise.
Next was trying out all three together. The time was...drum roll please...36min 23sec. I was pretty happy with that! Adding those two extra computers nearly cut the rendering time in half. This should be a huge help when rendering out the final animation for the house that I'm modelling.
Speaking of that house, I figured out why the shadows weren't quite right, there were no shadows! The default lamp in blender doesn't cast shadows, so I just switched to a sun lamp or a spot and everything looks much more realistic. I'll get some pictures up next week hopefully.
Wood Walls and Yadra
The house model is coming along slowly, but I hope to do some more work to it on the plane during my business trip today and tomorrow. I have added a screen material to the porch, along with a possible wood panelling for the walls.
 This second one is a bit dark, but I just sort of threw a lamp in there. I don't think that the shadows are quite right on the floor, so I'll have to look into proper shadows on an image texture.
I have also been playing around with the network rendering program YADRA. What yadra basically does is take multiple networked computers and render an animation using all of them, instead of just one. You can see the advantages because while one computer is working on one image, another can be working on a different image, so it should definitely reduce rendering time for larger animations.
As of right now I have three computers at home networked together, an old laptop that I used in college, my old desktop computer from work that I use for music, and my current laptop that I travel with. The specs for the machines are as follows:
1 x Dell Optiplex GX270, 2.8GHz Pentium 4, 1gb RAM, Windows XP
1 x Dell Latitude D600, 1.6GHz Pentium M, 512mb RAM, Linux Fedora 9
1 x HP Pavilion DV6000, 2GHz Centrino Duo, 2gb RAM, Windows Vista
I used my Gingerbread Man animation for a quick render test on each machine and got the following times:
Optiplex: 1 min 26 sec
Latitude: 2 min 8 sec
HP: 44 sec
Theoretically with all three networked together and rendering the same file the overall time would be less than all of those, however I didn't expect that with such a small quick animation. The computers still have to transfer the files back and forth, which takes up some time. On a larger animation you wouldn't notice this time as much, but I expected something a little slower than 44 seconds on this file. I ran all three computers and was rewarded with a time of 54 seconds.
This isn't too bad and was about what I expected. The frame distribution was as follows:
Optiplex: 13 frames
Latitude: 12 frames
HP: 15 frames
It makes sense that the fastest computer (also the master in my case) rendered the most frames. I am going to try a larger scale test later this week by rendering a part of the creature factory DVD trailer. I'll hopefully see a bigger performance increase with all three computers running.
Glass and Living Room

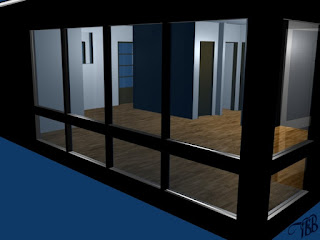 You can actually see the doors in this last one along with the door with windows in it in the far corner of the room leading to another bedroom.
The next step is to make a couple of sliding glass doors and finish up all the windows. I also have to add the rafters that can be seen over head in the living room and one bed room. It's coming along though!
Wood Materials
Now that the modelling is completely finished (minus some windows and a couple of sliding doors) I figured I would take a stab at doing some materials. I took a look at some of the materials on the Blender Material Repository and fooled around with some settings. This is sort of the first time I've done any real material work for realistic things, so it's a bit of a trial and error process. I think the wood materials came out pretty good actually.
The floor itself is a bit older in the house and I like the older rustic look, but I couldn't seem to get that in my recreation, so a fairly new floor will have to do!
I also attempted to do a bit of head design work for a member of the Blender Artists Forums, but the head didn't really match the body too much. Take a look.
Blender for Architecture
Captain Blender has sort of taken a hiatus as I've gotten into modelling this house more. I finished up doing most of the actual modelling this weekend. All of the walls are done, along with the floor and the roof.
The next step is adding some doors and windows, then adding some materials.
 I picked up Allan Brito's book "Blender 3D Architecture, Buildings, and Scenery" last week. That book, along with his blog offers some good tips. The book itself is pretty easy to follow, however it is a little bit basic in the modelling stage. For instance, the roof is completely overlooked. I skimmed through the last half of the book and the materials and lighting seems to be more detailed however. If you are interested in it I would recommend buying just the ebook to start out.
Sheldon and CB
As promised I do have an update today. I don't have an animation, but Captain Blender is now fully posable as you can see in these quick renders.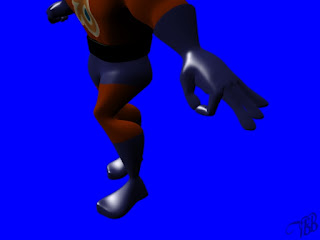
 I think he looks pretty good now. Tony has a chapter next about teaching basic animation with a bouncing ball, which will be good for me to go through as I haven't done any sort of animation as of yet (minus the gingerbread man). Getting the basics down before I start to make CB jump and run is probably a good idea!
I also played around last night with some toon shading. I saw a picture on Blender Artists yesterday (can't remember which one) that made me think of my sheldon model. I dug him out and played around a bit with different toon materials and edge settings.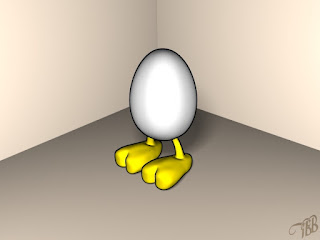
This is what I came up with for a basic toon style. It took a bunch of trial and error to come up with this, however I'm sure there are tutorials out there on it. I ended up adding a lot of lights and dropping the hardness down all the way to make it look more flat. I also added a specular color that was a little bit darker than the actual colors and dropped the spec setting down to zero. Next, I played around a bit with the Ref and Amb settings to make everything a bit brighter. Finally, I added an edge with the edge detect system in the render buttons. He still looks a bit 3D in this view, but this could be because of the shadows too. A straight on shot would probably make him look very flat.
And just for fun because I like composites:
